今回は、RubyMotion で簡単なアプリを作ってみます。ここでは簡単な「StopWatch」アプリケーションを作成し、RubyMotion でどのように iOS アプリを作成するのか説明したいと思います。
StopWatch アプリの簡単な仕様は、
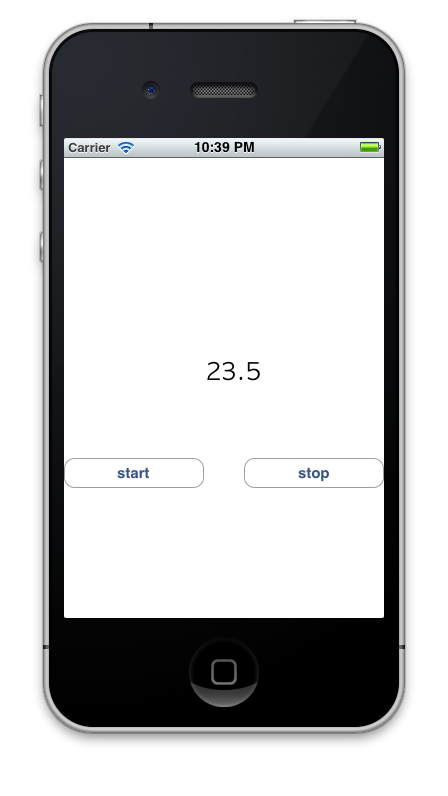
start ボタン、stop ボタンとタイマーの値を表示するラベルを持っています。
start ボタンが押されると、タイマーがスタートします。
stop ボタンが押されると、タイマーを停止します。
タイマーが動作中の値を 0.1 秒刻みでラベルに表示します。
です。
新規アプリを作成する
RubyMotion をインストールしたときに、/usr/bin/motion というコマンドがインストールされます。このコマンドを使用して、新規アプリのひな形を作成します。Terminal で次のようにコマンドを実行するとひな形が用意されます。
1
2
3
4
5
6
7
8
9
$ motion create StopWatch
    Create StopWatch
    Create StopWatch/.gitignore
    Create StopWatch/Rakefile
    Create StopWatch/app
    Create StopWatch/app/app_delegate.rb
    Create StopWatch/resources
    Create StopWatch/spec
    Create StopWatch/spec/main_spec.rb
Rakefile: アプリ名などの設定に利用します。
app: アプリを実装するファイルを置くためのディレクトリです。
resources: 音声や画像などのリソースを置くためのディレクトリです。
spec: アプリのテストケースを記述したファイルを置くためのディレクトリです。
Rakefile で設定できる内容などについては、Project Management に詳しく書かれていますので、目を通されておくと良いでしょう。
motion コマンドの簡単な使い方は motion -h で確認できます。
1
2
3
4
5
6
7
8
9
10
11
$ motion -h
Usage:
  motion [-h, --help]
  motion [-v, --version]
  motion <command> [<args...>]

Commands:
  create       Create a new project
  activate     Activate the software license
  update       Update the software
  support      Create a support ticket
アプリを実装する
さっそくアプリを実装していきましょう。app/app_delegate.rb をエディタで開いてみます。
1
2
3
4
5
class AppDelegate
def application ( application , didFinishLaunchingWithOptions : launchOptions )
true
end
end
このファイルに、UIKit Framework リファレンス を参考に UI 部品を配置するためのコードや、アクションを記述していきます。
1. UIWindow を配置する
UIWindow のオブジェクトがないと何もできないといっても良いくらい重要なものです。まず、UIWindow のオブジェクトを用意します。
1
2
3
4
5
6
7
8
9
10
11
class AppDelegate
def application ( application , didFinishLaunchingWithOptions : launchOptions )
@window = UIWindow . alloc . initWithFrame ( UIScreen . mainScreen . bounds )
# UIViewController を継承した StopWatchViewController をルートコントローラーに設定
@window . rootViewController = StopWatchViewController . alloc . init
@window . makeKeyAndVisible
true
end
end
UIViewController を継承した StopWatchViewController をルートコントローラーに設定しています。
UIViewController は一画面分のコンテンツを管理したり、表示するための基本な機能を提供してくれます。
2. StopWatchViewController を用意する
StopWatchViewController を以下のように用意します。UIViewController を継承し、viewDidLoad メソッドを用意しておけば良いでしょう。初期化が終わり画面が表示される段階になると viewDidLoad メソッドが呼び出されるので、このメソッドで UI の配置を行います。
1
2
3
4
class StopWatchViewController < UIViewController
  def viewDidLoad
  end
end
viewDidLoad メソッドに、UI 部品を配置するコードを記述していきます。UI 部品の配置は、UIView に対して行います。
1
2
3
4
5
6
7
8
9
# UIView を取得
view = self . view
# 背景色を設定
view . backgroundColor = UIColor . whiteColor
# 画面のサイズ
frame = view . bounds
height = frame . size . height
width = frame . size . width
UI 部品の配置
上記のように UIView を取得したあと、UI 部品の設定などを行い addSubview を実行すると UI 部品が配置されます。それでは、start ボタン、stop ボタンとラベルを配置してみましょう。
start ボタンを配置
1
2
3
4
5
6
7
8
9
10
11
# start ボタン
@start = UIButton . buttonWithType ( UIButtonTypeRoundedRect )
@start . frame = CGRectMake ( 0 , 300 , width / 2 - 20 , 30 )
@start . setTitle ( "start" , forState : UIControlStateNormal )
# start ボタンがクリックされたとき、startTimer アクションメソッドが呼ばれるようにする
@start . addTarget ( self ,
action : "startTimer:" ,
forControlEvents : UIControlEventTouchUpInside )
view . addSubview ( @start )
stop ボタンを配置
1
2
3
4
5
6
7
8
9
10
11
# stop ボタン
@stop = UIButton . buttonWithType ( UIButtonTypeRoundedRect )
@stop . frame = CGRectMake ( width / 2 + 20 , 300 , width / 2 - 20 , 30 )
@stop . setTitle ( "stop" , forState : UIControlStateNormal )
# stop ボタンがクリックされたとき、stopTimer アクションメソッドが呼ばれるようにする
@stop . addTarget ( self ,
action : "stopTimer:" ,
forControlEvents : UIControlEventTouchUpInside )
view . addSubview ( @stop )
ラベルを配置
1
2
3
4
5
6
# タイマーの値を表示するラベル
@label = UILabel . alloc . init
@label . frame = CGRectMake ( 20 , 200 , width - 20 , 30 )
@label . font = UIFont . fontWithName ( "AppleGothic" , size : 24 )
@label . textAlignment = UITextAlignmentCenter
view . addSubview ( @label )
アクションメソッドを実装
start ボタンがクリックされたときには startTimer アクションメソッドが、stop ボタンがクリックされたときには stopTimer アクションメソッドが呼ばれるようにしましたので、それらのアクションメソッドを用意します。
1
2
3
4
5
6
7
8
9
10
11
12
13
14
15
16
17
18
19
20
21
22
23
24
def startTimer ( sender )
if @timer == nil
@time = 0 . 0
@timer = NSTimer
. scheduledTimerWithTimeInterval ( 0 . 1 ,
target : self ,
selector : "timerHandler:" ,
userInfo : nil ,
repeats : true )
end
end
def stopTimer ( sender )
if @timer
@timer . invalidate
@timer = nil
end
end
def timerHandler ( userInfo )
@time += 0 . 1
string = sprintf ( "%.1f" , @time )
@label . text = string
end
startTimer では、0.1 秒ごとに timerHandler を呼び出すようにタイマーを用意しています。
timerHandler でタイマーの値をラベルに表示しています。stopTimer では @timer.invalidate でタイマーを停止しています。
**重要**
現在、RubyMotion のメモリ管理の仕様として長期間に渡って使用するデータはインスタンス変数やグローバル変数として宣言しておく必要があります。
参考:
Runtime
アプリを実行する
サンプルアプリを実行したときと同じように、Terminal で rake コマンドを実行してアプリを動かします。
1
2
3
4
5
6
7
8
9
10
$ rake
Build . /build / iPhoneSimulator - 5 . 1 - Development
Compile . /app / app_delegate . rb
Create . /build / iPhoneSimulator - 5 . 1 - Development / StopWatch . app
Link . /build / iPhoneSimulator - 5 . 1 - Development / StopWatch . app / StopWatch
Create . /build / iPhoneSimulator - 5 . 1 - Development / StopWatch . app / Info . plist
Create . /build / iPhoneSimulator - 5 . 1 - Development / StopWatch . app / PkgInfo
Create . /build / iPhoneSimulator - 5 . 1 - Development / StopWatch . dSYM
Simulate . /build / iPhoneSimulator - 5 . 1 - Development / StopWatch . app
( main ) >>
付録: コード
今回作成したコードの全文は以下のようになります。
1
2
3
4
5
6
7
8
9
10
11
12
13
14
15
16
17
18
19
20
21
22
23
24
25
26
27
28
29
30
31
32
33
34
35
36
37
38
39
40
41
42
43
44
45
46
47
48
49
50
51
52
53
54
55
56
57
58
59
60
61
62
63
64
65
66
67
68
69
70
71
72
73
74
75
76
77
78
79
80
81
82
83
84
class StopWatchViewController < UIViewController
def viewDidLoad
# UIView を取得
view = self . view
# 背景色を設定
view . backgroundColor = UIColor . whiteColor
# 画面のサイズ
frame = view . bounds
height = frame . size . height
width = frame . size . width
#--------------------
# start ボタン
@start = UIButton . buttonWithType ( UIButtonTypeRoundedRect )
@start . frame = CGRectMake ( 0 , 300 , width / 2 - 20 , 30 )
@start . setTitle ( "start" , forState : UIControlStateNormal )
# start ボタンがクリックされたとき、startTimer アクションメソッドが呼ばれるようにする
@start . addTarget ( self ,
action : "startTimer:" ,
forControlEvents : UIControlEventTouchUpInside )
view . addSubview ( @start )
#--------------------
# stop ボタン
@stop = UIButton . buttonWithType ( UIButtonTypeRoundedRect )
@stop . frame = CGRectMake ( width / 2 + 20 , 300 , width / 2 - 20 , 30 )
@stop . setTitle ( "stop" , forState : UIControlStateNormal )
# stop ボタンがクリックされたとき、stopTimer アクションメソッドが呼ばれるようにする
@stop . addTarget ( self ,
action : "stopTimer:" ,
forControlEvents : UIControlEventTouchUpInside )
view . addSubview ( @stop )
#--------------------------
# タイマーの値を表示するラベル
@label = UILabel . alloc . init
@label . frame = CGRectMake ( 20 , 200 , width - 20 , 30 )
@label . font = UIFont . fontWithName ( "AppleGothic" , size : 24 )
@label . textAlignment = UITextAlignmentCenter
view . addSubview ( @label )
end
def startTimer ( sender )
if @timer == nil
@time = 0 . 0
@timer = NSTimer
. scheduledTimerWithTimeInterval ( 0 . 1 ,
target : self ,
selector : "timerHandler:" ,
userInfo : nil ,
repeats : true )
end
end
def stopTimer ( sender )
if @timer
@timer . invalidate
@timer = nil
end
end
def timerHandler ( userInfo )
@time += 0 . 1
string = sprintf ( "%.1f" , @time )
@label . text = string
end
end
class AppDelegate
def application ( application , didFinishLaunchingWithOptions : launchOptions )
@window = UIWindow . alloc . initWithFrame ( UIScreen . mainScreen . bounds )
# UIViewController を継承した StopWatchViewController をルートコントローラーに設定
@window . rootViewController = StopWatchViewController . alloc . init
@window . makeKeyAndVisible
true
end
end